かきスタンプ

福岡でフリーランスの物流系のエンジニアやってます。

Node.js :csvファイルから jsonファイルへの変換は、convert-csv-to-json がいい感じ。

Node.js は標準で csvを扱うライブラリを持ってないんで、npm で引っ張ってこないといけないみたい。
という訳で、以下を試してみました。

ダウンロード数はそれほど多くないけど、ファイル変換に使うなら、convert-csv-to-json がいい感じ。

<インストール>

npm i convert-csv-to-json

csvファイル → jsonファイルへの変換が、わずか5行。

<変換プログラム例>

let csvToJson = require('convert-csv-to-json');
 
let fileInputName = 'translate_01.csv'; 
let fileOutputName = 'translate_11.json';
 
csvToJson.fieldDelimiter(',');
csvToJson.generateJsonFileFromCsv(fileInputName,fileOutputName);

デリミタ(区切り文字)のデフォルトが「;」となっています。
カンマ区切りの csv を対象とする場合、上記のように fieldDelimiter にて「,」を指定します。
 
詳細はnpmドキュメントをご参照ください。

Visual Studio 2019 Launch Event in Fukuoka振り返り:ハンズオンの Visual Studio 2019 使用バージョン

こちらのイベントに参加させて頂きました。
fukuten.connpass.com

Visual Studio をはじめとした Microsoft の最新情報を届けてくれると同時に、ハンズオンまであるという濃いイベント。
 
ハンズオンにて紹介している資料では、Azure Cloud Shell を使用していますが、せっかくなので、Visual Studio 2019 でやってみました。
 
なお、ハンズオン資料は以下です。
Visual Studio 2019 Launch Event in Fukuoka

ASP.NET Core を使用して Web API を作成する - Learn | Microsoft Docs

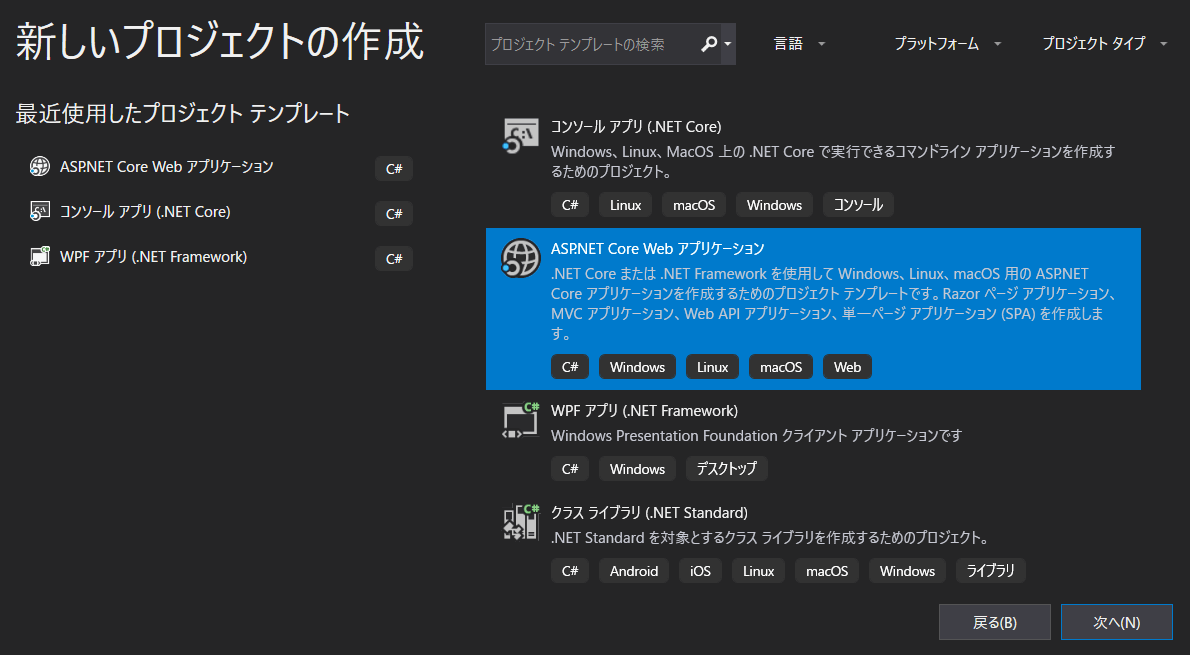
1.新しいプロジェクトの作成
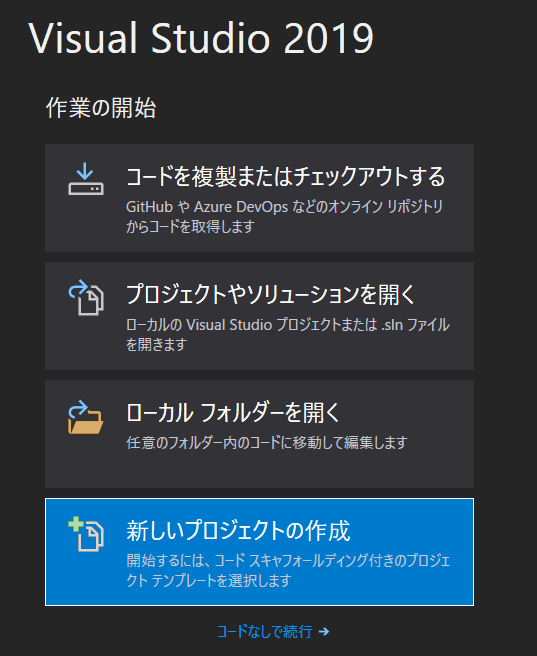
f:id:kakisoft:20190416015035p:plain

2.ASP.NET Core Webアプリケーション

f:id:kakisoft:20190416015046p:plain

3.プロジェクト名を入力

プロジェクト名は、チュートリアル同様「RetailApi」としました。
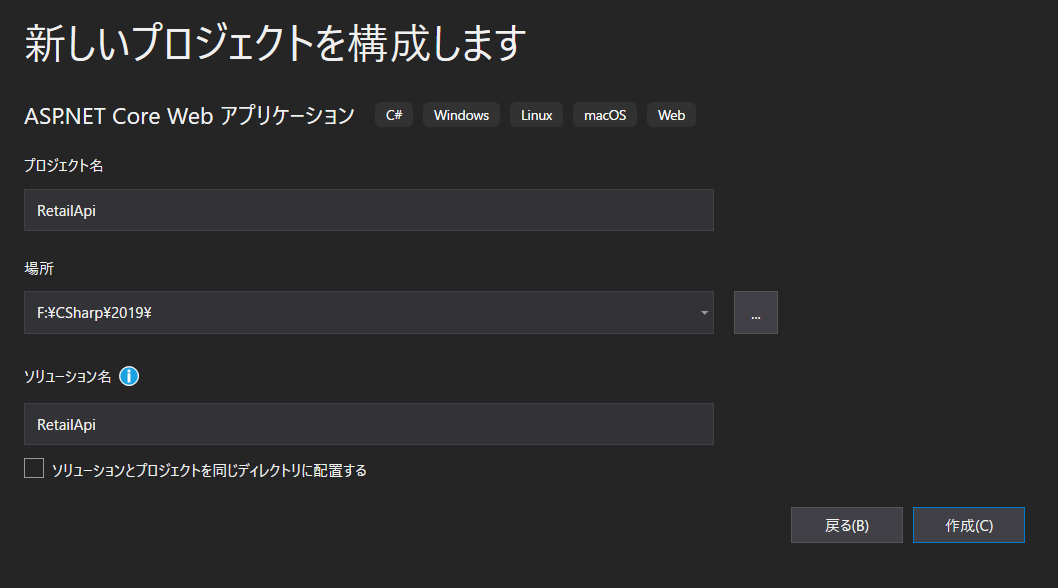
f:id:kakisoft:20190416015058p:plain

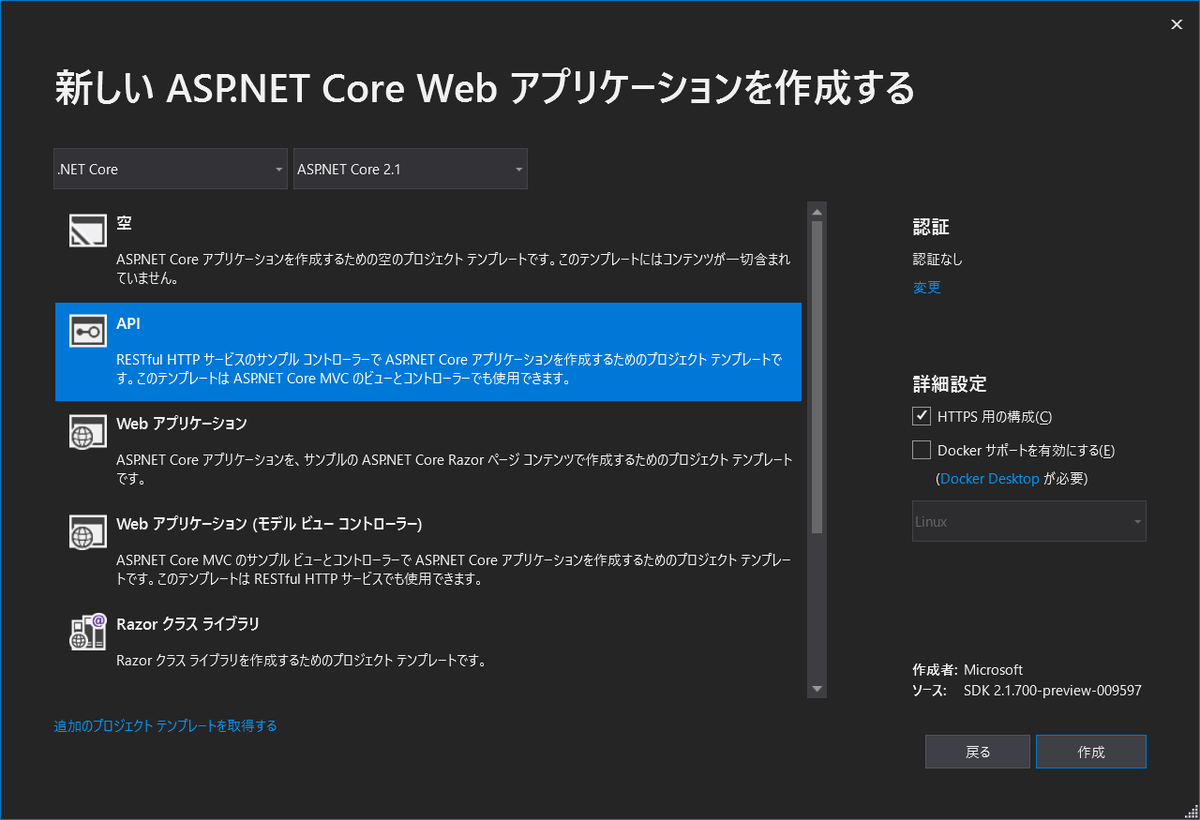
4.「API」を選択

f:id:kakisoft:20190416015112p:plain

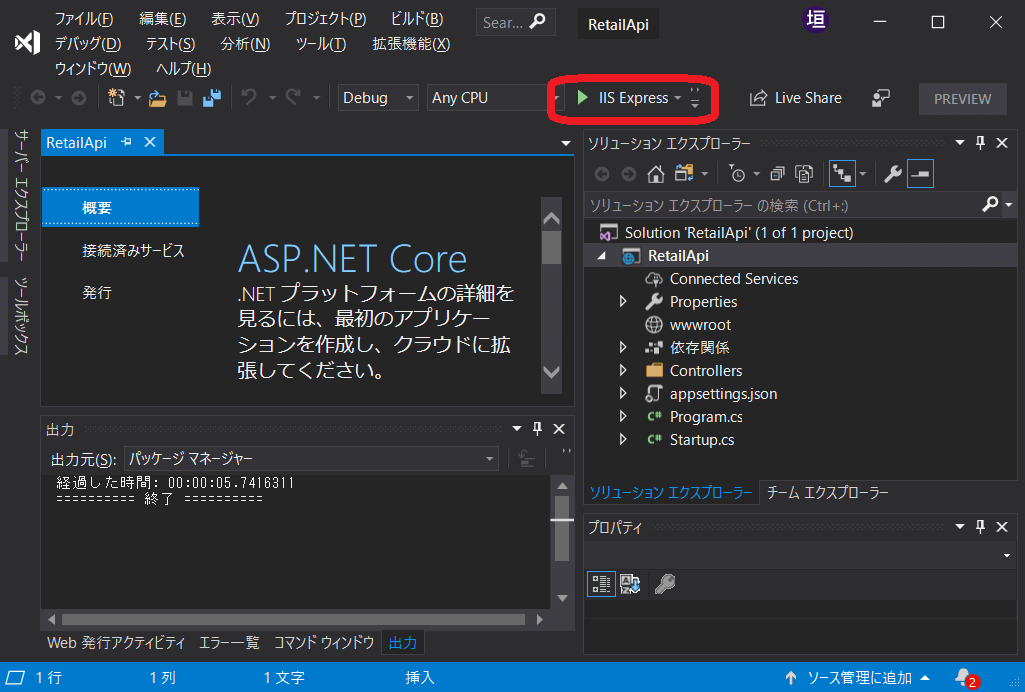
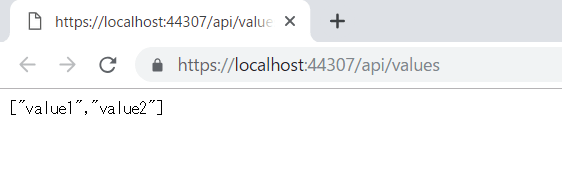
5.実行

▶ボタンを押すと、Webサーバが起動します。
f:id:kakisoft:20190416015124p:plain

f:id:kakisoft:20190416015137p:plain

6.フォルダを追加

一旦、Webサーバを停止させます。
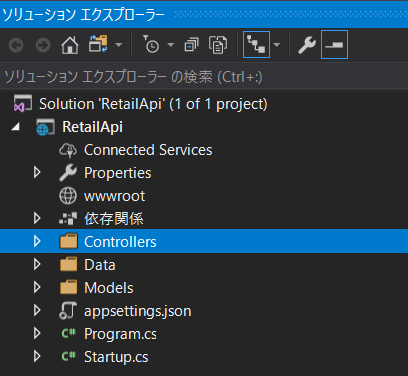
フォルダを追加します。RetailApiの階層にて右クリックし、フォルダを追加。

f:id:kakisoft:20190416015155p:plain

7.

以下の3つのフォルダを作成します。

  • Controllers
  • Data
  • Models

f:id:kakisoft:20190416015215p:plain

8.ファイルを追加

ファイルを追加します。
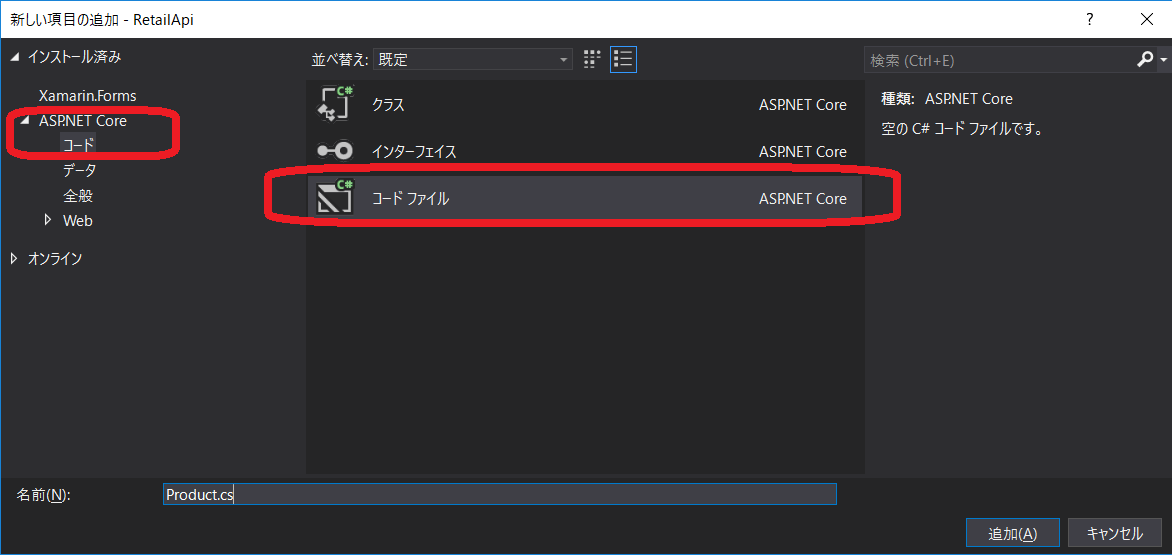
追加する階層にて右クリックし、「新しい項目」を選択。
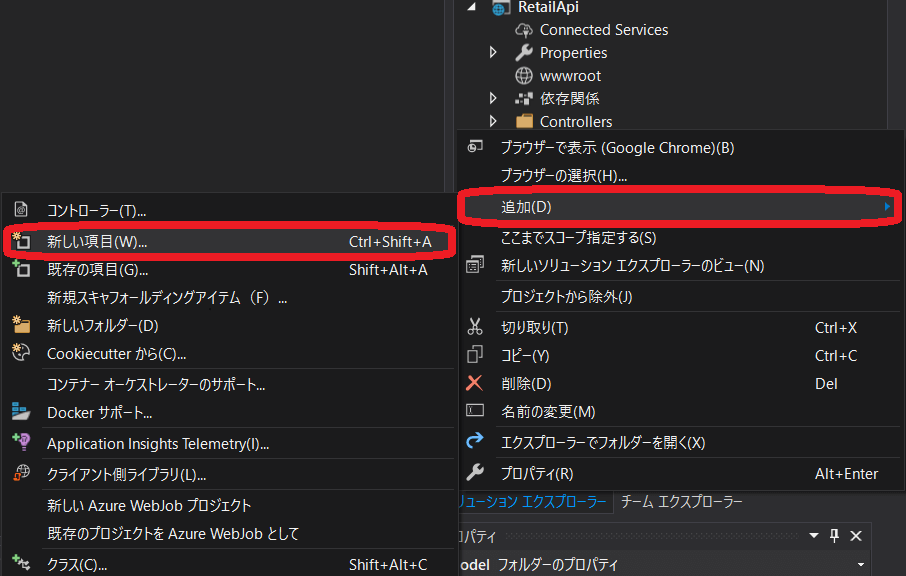
f:id:kakisoft:20190416015227p:plain

9.

コードファイルを選択し、作成。

f:id:kakisoft:20190416015237p:plain

10.

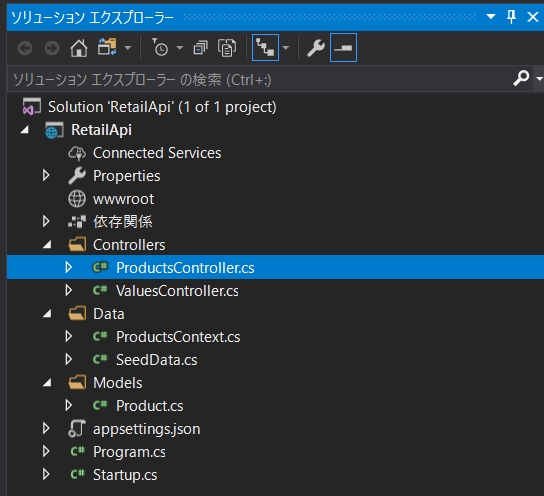
最終的にこんな感じになります。

f:id:kakisoft:20190416015247p:plain

追加・編集するコードは以下のようになります。

Controllers/ProductsController.cs

using System.Collections.Generic;
using System.Linq;
using System.Threading.Tasks;
using Microsoft.AspNetCore.Mvc;
using Microsoft.EntityFrameworkCore;
using RetailApi.Data;
using RetailApi.Models;

namespace RetailApi.Controllers
{
    [Route("api/[controller]")]
    [ApiController]
    public class ProductsController : ControllerBase
    {
        private readonly ProductsContext _context;

        public ProductsController(ProductsContext context)
        {
            _context = context;
        }

        [HttpGet]
        public ActionResult<List<Product>> GetAll() =>
            _context.Products.ToList();

        // GET by ID action
        [HttpGet("{id}")]
        public async Task<ActionResult<Product>> GetById(long id)
        {
            var product = await _context.Products.FindAsync(id);

            if (product == null)
            {
                return NotFound();
            }

            return product;
        }

        // POST action
        [HttpPost]
        public async Task<ActionResult<Product>> Create(Product product)
        {
            _context.Products.Add(product);
            await _context.SaveChangesAsync();

            return CreatedAtAction(nameof(GetById), new { id = product.Id }, product);
        }

        // PUT action
        [HttpPut("{id}")]
        public async Task<IActionResult> Update(long id, Product product)
        {
            if (id != product.Id)
            {
                return BadRequest();
            }

            _context.Entry(product).State = EntityState.Modified;
            await _context.SaveChangesAsync();

            return NoContent();
        }

        // DELETE action
        [HttpDelete("{id}")]
        public async Task<IActionResult> Delete(long id)
        {
            var product = await _context.Products.FindAsync(id);

            if (product == null)
            {
                return NotFound();
            }

            _context.Products.Remove(product);
            await _context.SaveChangesAsync();

            return NoContent();
        }

    }
}

Controllers/ValuesController.cs

using System;
using System.Collections.Generic;
using System.Linq;
using System.Threading.Tasks;
using Microsoft.AspNetCore.Mvc;

namespace RetailApi.Controllers
{
    [Route("api/[controller]")]
    [ApiController]
    public class ValuesController : ControllerBase
    {
        // GET api/values
        [HttpGet]
        public ActionResult<IEnumerable<string>> Get()
        {
            return new string[] { "value1", "value2" };
        }

        // GET api/values/5
        [HttpGet("{id}")]
        public ActionResult<string> Get(int id)
        {
            return "value";
        }

        // POST api/values
        [HttpPost]
        public void Post([FromBody] string value)
        {
        }

        // PUT api/values/5
        [HttpPut("{id}")]
        public void Put(int id, [FromBody] string value)
        {
        }

        // DELETE api/values/5
        [HttpDelete("{id}")]
        public void Delete(int id)
        {
        }
    }
}

Data/ProductsContext.cs

using Microsoft.EntityFrameworkCore;
using RetailApi.Models;

namespace RetailApi.Data
{
    public class ProductsContext : DbContext
    {
        public ProductsContext(DbContextOptions<ProductsContext> options)
            : base(options)
        {
        }

        public DbSet<Product> Products { get; set; }
    }
}

Data/SeedData.cs

using System;
using System.Linq;
using Microsoft.EntityFrameworkCore;
using Microsoft.Extensions.DependencyInjection;
using RetailApi.Models;

namespace RetailApi.Data
{
    public static class SeedData
    {
        public static void Initialize(IServiceProvider serviceProvider)
        {
            using (var context = new ProductsContext(serviceProvider
                .GetRequiredService<DbContextOptions<ProductsContext>>()))
            {
                if (!context.Products.Any())
                {
                    context.Products.AddRange(
                        new Product { Name = "Squeaky Bone", Price = 20.99m },
                        new Product { Name = "Knotted Rope", Price = 12.99m }
                    );

                    context.SaveChanges();
                }
            }
        }
    }
}   

Models/Product.cs

using System.ComponentModel.DataAnnotations;

namespace RetailApi.Models
{
    public class Product
    {
        public long Id { get; set; }

        [Required]
        public string Name { get; set; }

        [Required]
        [Range(minimum: 0.01, maximum: (double)decimal.MaxValue)]
        public decimal Price { get; set; }
    }
}

Program.cs

using System;
using Microsoft.AspNetCore;
using Microsoft.AspNetCore.Hosting;
using Microsoft.Extensions.DependencyInjection;
using Microsoft.Extensions.Logging;
using RetailApi.Data;

namespace RetailApi
{
    public class Program
    {
        public static void Main(string[] args)
        {
            var host = CreateWebHostBuilder(args).Build();
            SeedDatabase(host);
            host.Run();
        }

        public static IWebHostBuilder CreateWebHostBuilder(string[] args) =>
            WebHost.CreateDefaultBuilder(args)
                .UseStartup<Startup>();

        private static void SeedDatabase(IWebHost host)
        {
            using (var scope = host.Services.CreateScope())
            {
                var services = scope.ServiceProvider;

                try
                {
                    var context = services.GetRequiredService<ProductsContext>();
                    context.Database.EnsureCreated();
                    SeedData.Initialize(services);
                }
                catch (Exception ex)
                {
                    var logger = services.GetRequiredService<ILogger<Program>>();
                    logger.LogError(ex, "A database seeding error occurred.");
                }
            }
        }
    }
}

Startup.cs

using System;
using System.Collections.Generic;
using System.Linq;
using System.Threading.Tasks;
using Microsoft.AspNetCore.Builder;
using Microsoft.AspNetCore.Hosting;
using Microsoft.AspNetCore.HttpsPolicy;
using Microsoft.AspNetCore.Mvc;
using Microsoft.Extensions.Configuration;
using Microsoft.Extensions.DependencyInjection;
using Microsoft.Extensions.Logging;
using Microsoft.Extensions.Options;
using Microsoft.EntityFrameworkCore;
using RetailApi.Data;

namespace RetailApi
{
    public class Startup
    {
        public Startup(IConfiguration configuration)
        {
            Configuration = configuration;
        }

        public IConfiguration Configuration { get; }

        // This method gets called by the runtime. Use this method to add services to the container.
        public void ConfigureServices(IServiceCollection services)
        {
            services.AddDbContext<ProductsContext>(options =>
                options.UseInMemoryDatabase("Products"));

            services.AddMvc().SetCompatibilityVersion(CompatibilityVersion.Version_2_1);
        }

        // This method gets called by the runtime. Use this method to configure the HTTP request pipeline.
        public void Configure(IApplicationBuilder app, IHostingEnvironment env)
        {
            if (env.IsDevelopment())
            {
                app.UseDeveloperExceptionPage();
            }
            else
            {
                app.UseHsts();
            }

            app.UseHttpsRedirection();
            app.UseMvc();
        }
    }
}

ソースの詳細については、公式サイトをご参照ください。

docs.microsoft.com

Apache:mod_rewrite モジュールの、『RewriteCond %{HTTPS} off』がよく分からなかったから調べた。

.htaccess の記述設定で

RewriteCond %{HTTPS} off
RewriteCond %{HTTPS} !on

といった記述があった。

が、RewriteCond の構文は、

RewriteCond TestString CondPattern(正規表現) [flags]

となっている。 https://httpd.apache.org/docs/current/mod/mod_rewrite.html#rewritecond

え? 「off」って正規表現じゃなくね? って思ってマニュアルをよく調べたら、こんな記述があった。

If the TestString has the special value expr, the CondPattern will be treated as an ap_expr. HTTP headers referenced in the expression will be added to the Vary header if the novary flag is not given.
 
(TestStringが特別な値だったら、CondPattern は、正規表現でなく ap_exprとして扱われます。 )

って事だった。

という訳で、参照するべきページはここ。 https://httpd.apache.org/docs/current/expr.html

HTTPS  -  "on" if the request uses https, "off" otherwise
(リクエストがhttpsを使用している場合は 'on'、それ以外の場合は 'off')

って事らしい。

なので、常時SSL対応として .htaccess(または httpd.conf)を編集する場合、

RewriteCond %{HTTPS} off

を決まり文句として考えて良さそう。

GitHub に csv・tsv のファイルをアップすると、いい感じに表現してくれる。

タイトル通りです。
特別な事は何もせず、csv や tsv をアップし、ブラウザ上でアップしたファイルを見ると、こんな感じに表現してくれます。

f:id:kakisoft:20190304211256p:plain

フィルタリング機能も付いてたりと、色々と気が利いています。
 
無料ダウンロードできるデータを適当に拾い、リポジトリに上げてみたので、見てみたい方はどうぞ。
csv
tsv


ただ、あんまり大きなデータは表現してくれないみたいです。

この機能についての、GitHubのリファレンスはこちらです。

PHP:処理結果をログに吐いて動作確認。(LAMPならどんな環境でも多分OK)

Linux + PHP + Apache で開発していて、特定の処理をログに吐いて動作確認したい場合、設定の自由度の高さゆえ、サービスで設定しているログの出力先を解析するのが面倒臭いケースも多々あるかと思います。
 
加えて、ディストリビューションやバージョンの違いによる差異もあるし。
 
そんな場合、一時的な出力先を作成して、ログを吐くのが楽なんじゃないかと思います。
具体的には以下のような操作。LAMPなら、多分どんなディストリやバージョンでも行けます。
 

サーバ側の設定

  • 一時的なログ出力先のフォルダとファイルを作成
  • ファイルのオーナーを apache に変更
  • ファイルの権限を変更

具体的なコマンド

sudo mkdir /test01
sudo touch testlog01

sudo chown apache:apache /test01
sudo chown apache:apache /test01/testlog01

sudo chmod 777 /test01
sudo chmod 777 /test01/testlog01

PHP側の記述

こんな感じ。

error_log($message,"3","/test01/testlog01");

第2引数に「3」を渡すと、ログファイルのパスを指定できます。
 
 
Vagrant を使ってる場合、特に設定を変えていなければ、suパスワードは「vagrant」です。

Git:【GUIで済ませたい人向け】logの確認は、VSCode のプラグイン「Git History」が便利。

Git のコミット履歴(ログ)の確認をコマンドラインで解決させるのは、私にとってはしんどいんで Visual Studio Codeプラグイン「Git History」を愛用しています。

インストール

プラグインの検索ウィンドウにて「git history」と検索。
インストールして再読み込み。
f:id:kakisoft:20190206000815p:plain

起動

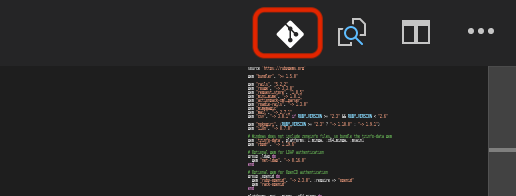
右上のアイコンを指定して起動します。
f:id:kakisoft:20190206000846p:plain  

履歴一覧

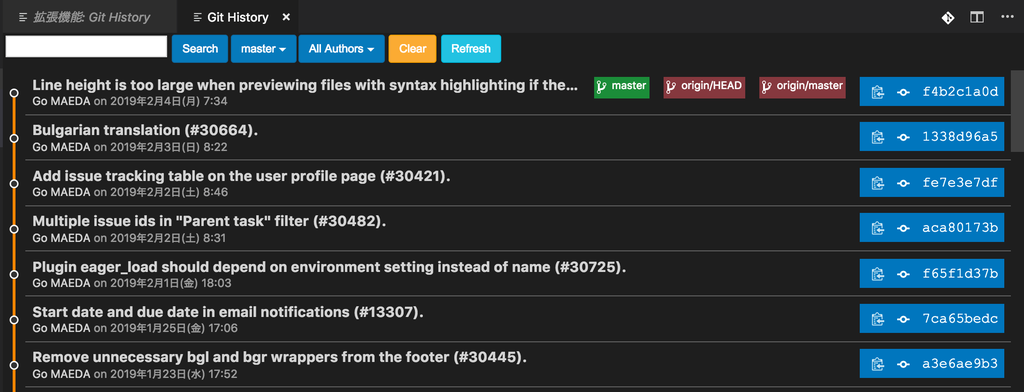
こんな感じで確認できます。
f:id:kakisoft:20190206000859p:plain  

差分を確認

ブランチを選択し、ファイルを選択。
f:id:kakisoft:20190206000937p:plain  
「Compare against workspace file」や
「Compare against previous version」を選択。
f:id:kakisoft:20190206001011p:plain  
こんな感じで差分を確認できます。 f:id:kakisoft:20190206001024p:plain  

commit間の差分を比較

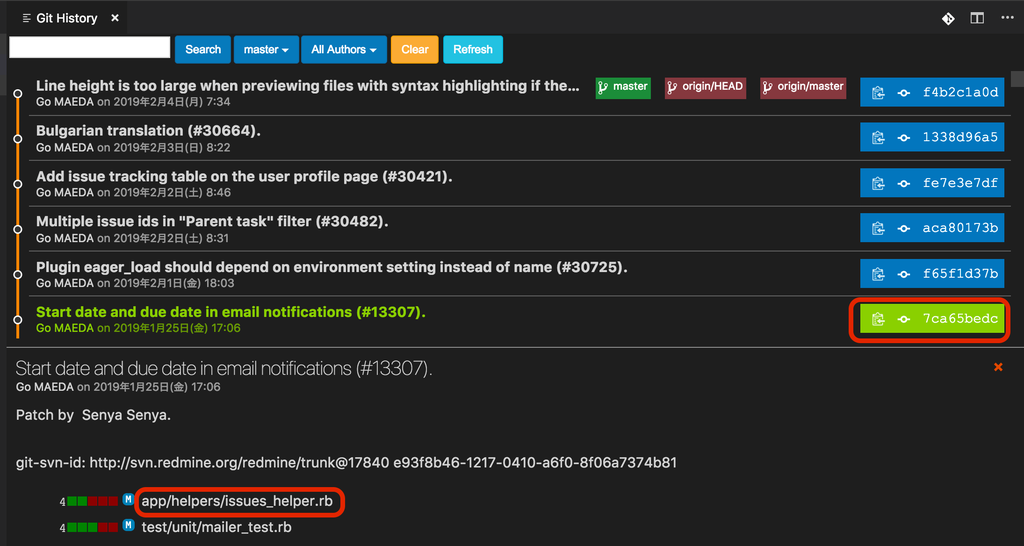
比較元のブランチの f:id:kakisoft:20190206225418p:plain マークを選択。
その後、「Select this commit ...」を選択。
f:id:kakisoft:20190206225500p:plain  
比較先のブランチの f:id:kakisoft:20190206225418p:plain マークを選択。
その後、「Compare with ...」を選択。
f:id:kakisoft:20190206225514p:plain  
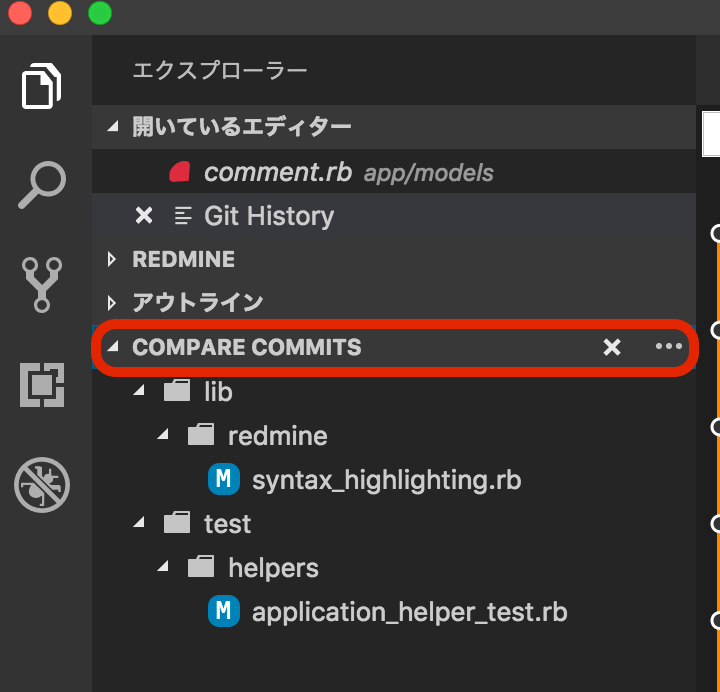
エクスプローラに、「COMPARE COMMITS」が表示されます。
f:id:kakisoft:20190206225528p:plain  
ファイル名を選択すると、差分を比較できます。
f:id:kakisoft:20190206225544p:plain  


<Git History
https://marketplace.visualstudio.com/items?itemName=donjayamanne.githistory

Windows ユーザが初めて Mac を触る時に、きっと役に立つエントリ

初回起動時

名前(ユーザ名)に日本語は使わない方いい。 その名前がホームフォルダになる。
私は「暁(さとる)」という名前なのですが、名前のとこが「akatsuki」というホームフォルダが作られてて、「なんじゃそりゃ!」ってなりました。
多分、変更できません。

下に並んでるアイコンS

Finder

f:id:kakisoft:20190120193814p:plain
エクスプローラに相当。

ターミナル

f:id:kakisoft:20190120193842p:plain
コマンドプロンプトに相当。

システム環境設定

f:id:kakisoft:20190120194007p:plain
コントロールパネルに相当。

メモ

f:id:kakisoft:20190120194102p:plain
Windows で言うメモ帳・・・とは全く違います。
txt 形式での保存も読み込みもしません。
 
メモ帳に相当するのは、『テキストエディット』というツールになります。
そっちは、「Finder -> アプリケーション」から起動してください。

設定

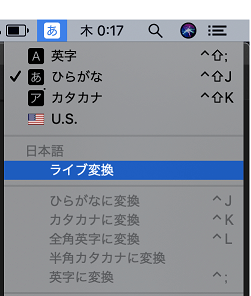
日本語入力してる時に勝手に変換されるアレは何!?

「ライブ変換」と言うらしい。
邪魔なら OFF にしておこう。
 
f:id:kakisoft:20190120194138p:plain

そもそも変換候補出さなくていいよ

システム環境設定 -> キーボード -> 入力ソース -> 「推測候補表示」をOFF

マウスのホイールの方向が逆なんだけど!?

WindowsLinux と上下が逆です。上に行こうとすると下に行き、下に行こうとすると上に行きます。

システム環境設定 -> マウス -> スクロールの方向:ナチュラ
のチェックを OFFにしよう。

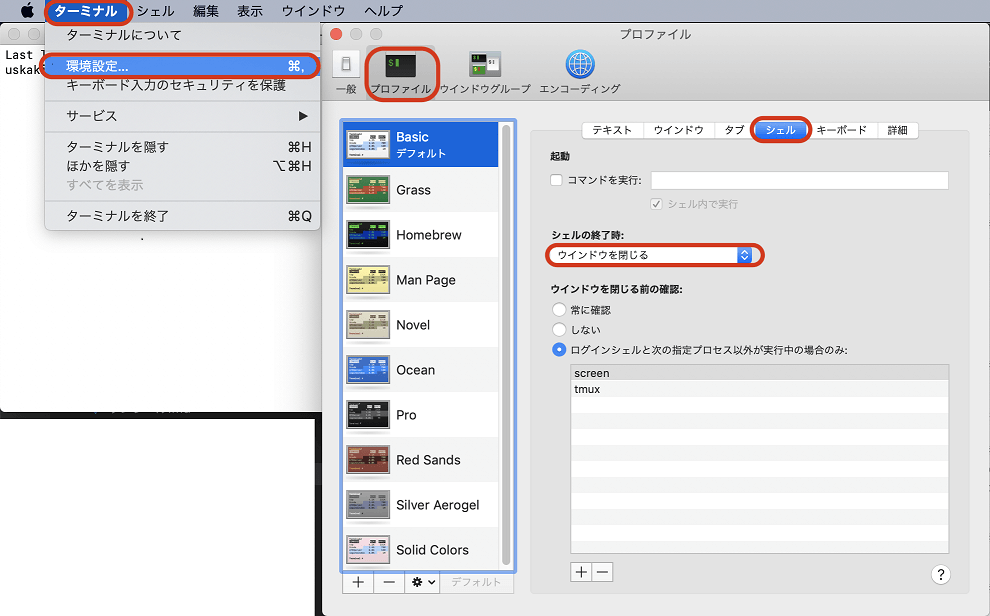
ターミナル exit 時の、[プロセスが完了しました] って何? 終わったら閉じてよ。

ターミナル -> 環境設定 -> プロファイル -> シェル
のタブにて、シェル終了時の動作を「ウィンドウを閉じる」
 
とすると、exit でウィンドウを閉じてくれる。
 
f:id:kakisoft:20190120194226p:plain

拡張子を表示するには?

Finder -> 左上メニュー -> すべてのファイル名拡張子を表示

スクロールバーが無いよ?

システム環境設定 -> 一般 -> スクロールバーの表示
にて、「常に表示」を選択。

コンピュータ名の変更は?

システム環境設定 -> 共有 -> 「コンピュータ名」を編集

操作

GUI でフォルダが開けない・・・

command + ↓

ファイルの削除ができん・・・

command + delete

コピー&ペーストは?

command + c → command + v

アンドゥ、リドゥは?

command + z
command + shift + z

 ウィンドウの最大化

command + control + f

ウィンドウの最小化

command + m

「alt + F4 」(アプリケーションの終了)は?

command + q
アプリのページ単位(ブラウザのタブ1つ単位など)を閉じる場合は、 command + w

「ctrl + tab」でのアプリ切り替えは?

command + tab

「ファイル名を指定して実行」は?

command + space

「cmd」でコマンドプロンプトを起動できる?

command + Space で入力枠が出てくるので、「ter」と入力。

「ペイント」はどこ?

デフォルトで入ってる「プレビュー」 というアプリでどうでしょう。
下図のマークを押すと、画像の編集が可能です。
 
f:id:kakisoft:20190120194252p:plain

デスクトップを表示するには?

fn + F11
が、何かのアプリを起動すると、全部のアプリがフロントに戻る。 Windows と違って使いづらい。

print screen(画面キャプチャ)は?

command + shift + 3
他にも、
command + shift + 4
で、部分的にキャプチャを取ることもできるぞ。

タッチパネルで右クリックができないんだけど・・・

指2本で真ん中あたりを軽くタッチしよう。
指1本だと、どこを選択しても左クリック扱い。  


では、快適な Mac ライフを。